When analysing your website data, one important thing to consider is what data is relevant for you and what is not. Excluding the data generated by developers or website administrators makes a lot of sense, as what they usually do on your own site usually differs a lot from what your actual visitors are doing.
In this post, I will go through the setup of excluding that irrelevant data. I will specifically look into a WordPress – Google Tag Manager – Google Analytics setup. If you haven’t checked my “How to manually add Google Tag Manager to a WordPress website” post yet, I encourage you to, as Google Tag Manager makes your life a lot easier!
There is a common way of excluding your own data like – creating an IP filter in GA. That method, unfortunately, does not work always, as in some cases, you can’t possibly catch all of the possible IP addresses. If the internal traffic from comes from different users, on different networks (that change frequently) it is impossilble to catch all IPs. Fortunately though, when you have a WordPress installation, there is an easier and better way of excluding the internal traffic.
Since all of the traffic that you want to exclude will come from either developers, website administrators or editors, you can safely assume that they will be using the site after they log-in. In that case, WordPress comes to save the day again, with a ready to use function – is_user_logged_in(). That handy function would return a boolean value of True if the user is logged in, or False if the user is not. Having that information at our disposal, we only have to pass it to the Data Layer
If you haven’t declared a Data Layer object, the code below will allow you to do that. It is important to mention, that the Data Layer object should be declared before the GTM container code, hence why the 3rd parameter in the add_action() function is “1”, which will add the code at the top of the “head” tag.
function addDataLayer(){
?>
<script>
  dataLayer = [];
</script>
<?php
}
add_action( 'wp_head', 'addDataLayer', 1 );
The code above adds the empty Data Layer object that can be populated with information which will be used by Google Tag Manager and send it to Google Analytics.
To populate the declared above Data Layer object, we will also need to add the following code in the functions.php file:
function userLoginStatus(){
	if(is_user_logged_in){
		echo "<script type='text/javascript'>
		    window.dataLayer = window.dataLayer || [];
		    dataLayer.push({
		       'visitorLoginState': 'logged-in'});
			</script>";
	 }
	 else{
	 echo "<script type='text/javascript'>
	    window.dataLayer = window.dataLayer || [];
	    dataLayer.push({
	       'visitorLoginState': 'logged-out'});
		 </script>";
	 }
}
add_action( 'wp_print_scripts', 'userLoginStatus' );
The code above uses wp_print_scripts() to add the function userLoginStatus() in the scripts queue. The userLoginStatus() function would return scripts which would either push “logged-in” or “logged-out” in the Data Layer, based on what the is_user_logged_in() returns. In that way we will have these two variables to use in GTM.
Once we have that data to work with, the easiest way to exclude the external traffic is to never even send it to Google Analytics in the first place. The blocking rules in GTM will work our magic for this.
Here is what we have to do:
1. Create the Data Layer type variable in GTM
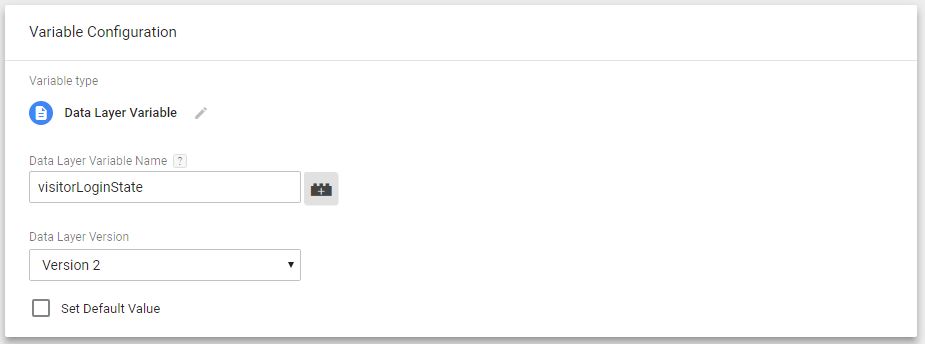
2. Create a trigger that will fire only on logged-in users
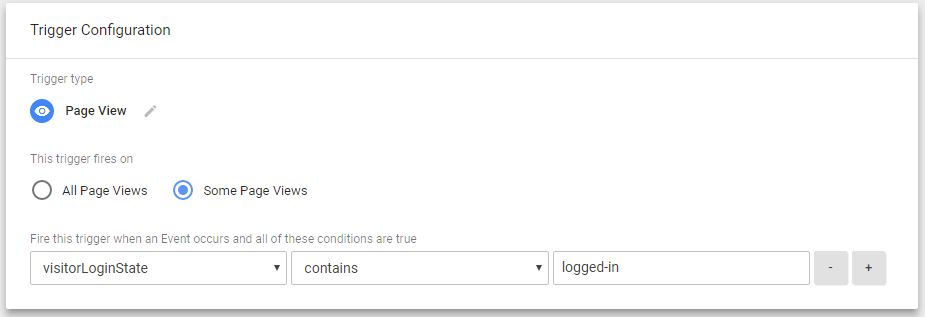
3. Add the trigger above as an exception and include it in all of our tags (the example below is from a Page View Tag)
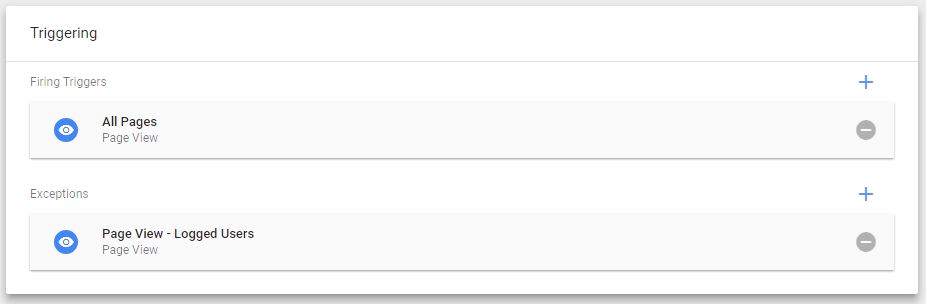
That is it, the configuration above will make sure there is no internal data sent to Google Analytics – which for me did exactly what I wanted. If for some reason you want to still collect and analyse the internal data, the configuration is a bit different.
In Google Analytics, for your Property:
1.Create a session level custom dimension “LoggedIn”
Admin > Property > Custom Definitions > Custom Dimensions > New

2.Pass the captured Daya Layer variable as custom dimension via your GTM Tag
In your Page View Tag, under More Settings > Custom Dimensions
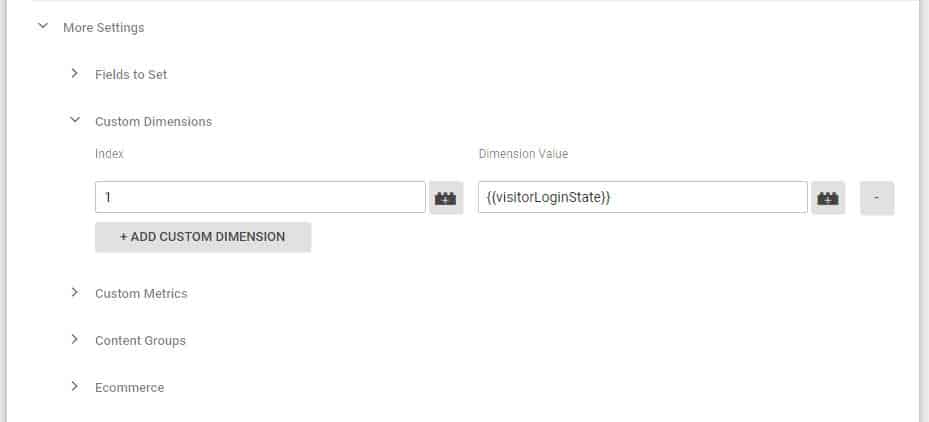
Make sure your Custom Dimension’s index in Google Analytics matches the Custom Dimension index you are entering in Google Tag Manager

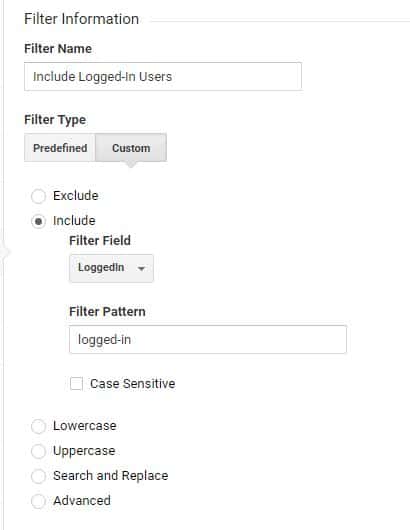
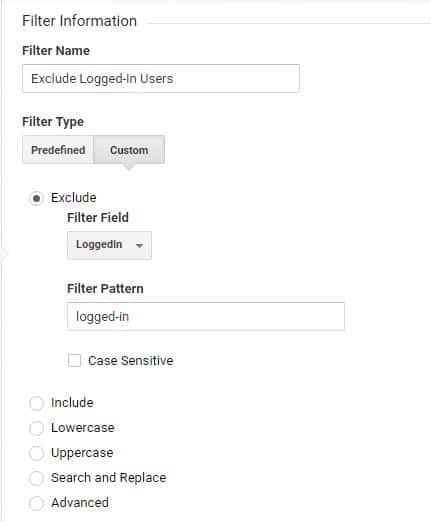
3. Configure Views with filters
Create a new view “Logged-in Users View” and add the following filter:
In your Main view add the following filter:
And that is all for this alternative method. You now have a separate view to analyse the internal traffic, and you are excluding the same from your Main View.
If you have any questions or feedback, please post a comment below 🙂
Share this Post